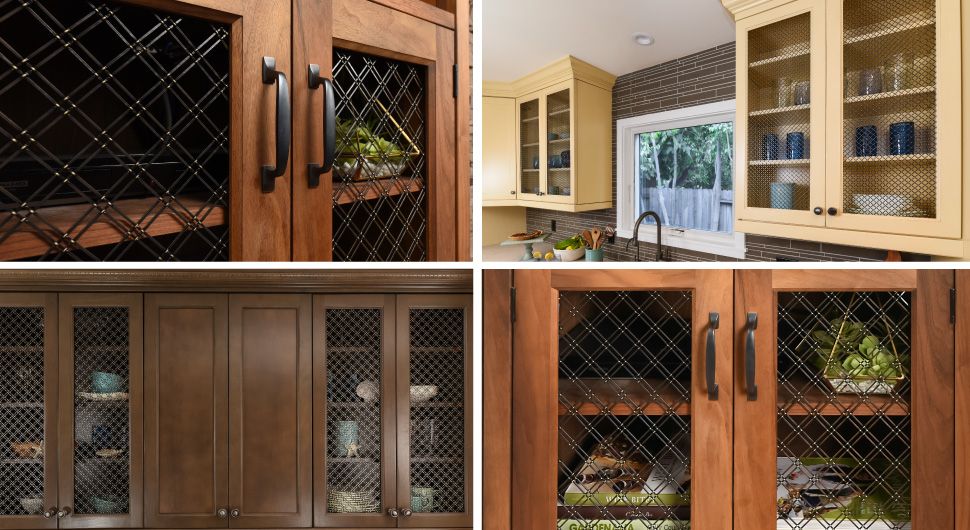
Decorative wire mesh is perfect for sprucing up your cabinets without the cost and time commitment of repainting them or replacing the frames. Whether you use the material for custom kitchen cabinetry, cupboards, a bar cabinet, or a standalone unit like a buffet or media console, it's sure to add a tasteful touch.
So, how do you attach wire mesh to cabinets? Find expert guidance and step-by-step instructions below.
How Do You Put Mesh in Cabinet Doors?

Once you have the material picked out, follow these steps to replace your cabinet façades with metal mesh.
1. Remove the Cabinet Doors
Your cabinet doors will be much easier to work if they’re lying on a flat surface, so start by removing them from the frames. Don’t forget to label your cabinet doors once you remove them! This is especially important for kitchen cabinets.
Most hinges can be detached using a basic screwdriver. If your cabinets have knobs, you'll need to remove those too.
2. Cut Out the Cabinet Faces
This step may be easier for certain kinds of cabinet doors than others. For example, if you have wood doors, you don’t want them to splinter when removing the panels. For small decorative cabinets, it may be possible to cut out the faces using a hand saw.
While it depends on the design of your cabinets, it's usually easiest to place them outside up. That way, you can follow the outline of the panels.

3. Cut the Mesh Panels to Size
Then cut the mesh into panels. Most wire mesh inserts for cabinet doors can be cut with tin snips, heavy-duty scissors, or a jigsaw blade.
Using the wood cabinet cutout as a guide, add 2 to 3 inches on each side so you have plenty of slack when attaching them to the frames. It's better to cut your panels too large than too small the first go-around, as you can always trim them down if needed.
4. Position the Inserts
Once the wire mesh sheets are cut to size, place your cabinet doors inside up. Then position the inserts over the opening, and use metal clamps to secure them temporarily in place. If you're using a square weave, make sure the wires are parallel to the perimeter. Diagonal weaves should line up with the corners.
5. Attach the Mesh Panels
Next, attach the mesh inserts to the cabinet door frames. With the doors still inside up on a flat surface, run a hot glue gun around the perimeter, then allow it to dry completely. Depending on the weave opening size, you might be able to use an industrial staple gun or even small nails.
6. Reattach the Doors and Knobs
Once the panels are securely attached and the glue is completely dry, you can remove the clamps and reattach the cabinet doors. Use a screwdriver to connect the hinges to the mounting plates on the frames, then adjust the doors until they're properly aligned. Lastly, reattach the knobs or install new ones that pair better with the wire mesh.
For design inspiration, see our blog on Decorative Wire Mesh Inserts for Cabinet Doors.

Shop Wire Mesh for Cabinet Doors from TWP Inc.
Mesh cabinet inserts are not only DIY-friendly but also very affordable. If you're thinking about fastening your own, you'll find all the necessary materials here.
TWP Inc. has been an industry-leading supplier of metal mesh and hardware cloth for residential and commercial applications since 1969. Our woman-owned company carries a wide range of products, including durable metal alloys and decorative styles with various weaves and finishes.
Shop our collection of in-stock products, or order a decorative mesh sample kit to see and feel the materials in person before deciding on a style.
Want some assistance with your project? We offer a variety of services that can help you get your project started off right. Our experienced team can assist with custom laser cutting, measuring, and more.
Want to have your cabinets featured in our gallery? Upload photos to Instagram with the hashtag #TWPWireMesh—and be sure to follow us!